
1Introduction
Old houses and energy saving
To combat climate change, we must reduce greenhouse gas emissions. It is about reducing energy consumption and the type of energy source we use. How we use our houses is also of great importance.
Seeing as the climate impacts of the building construction itself (production of materials, transport, construction) have already taken place regarding old houses, they represent an important resource that we must continue to use. Good maintenance and use of materials and building components that are very durable mean that you do not need to manufacture and replace building components very often.
It is fully possible to improve the energy efficiency of buildings worthy of protection without destroying the building’s character and history. It can often be done without large costs being involved, while at the same time reducing the cost of heating and improving comfort in the building.
Show consideration towards the house
With regard to old houses, it is especially important to show consideration when implementing energy efficiency improvement measures. Major changes to facades and interiors worthy of preservation should be avoided. It is even more important to avoid measures that lead to damage caused by moisture and rot, or a poor indoor climate. Therefore, it is important to understand how the house works, and to be aware of the consequences of the various measures.
There is no definitive answer as to what the best solution is when implementing energy saving measures. Each house has its own technical, architectural and utility characteristics, and must therefore be assessed individually. Often, professionals who possess good knowledge about traditional building technology, craftsmanship and building physics should be involved to ensure that the correct measures are implemented in the right way.
Energy saving and reducing climate impacts
There is currently a strong focus on energy consumption in order to reduce the impact on the climate. For buildings that are worthy of protection, it will often not be possible to reduce energy consumption so that it corresponds to new buildings. The use of renewable energy can compensate for this so that old buildings do not negatively impact the climate more than new buildings.
Many old houses are heated by wood-burning stoves and open fires. Firewood is a renewable resource and is not included in the CO2 accounts. There are also several other alternative sources of heating, such as geothermal heating, wood-pellet heating and solar heating.
Who is this guide for?
- Owners and users of old houses
- Architects and consultants
- Material suppliers and craftsmen
- Case officers in municipalities and counties
2Before starting
Safeguard culturally and historically important values
Old buildings tell stories about historical development, about how people lived in the past, about access to and the use of resources, about old construction technology and use of materials, and about what people thought was attractive and practical. They are a source of knowledge and experiences, and often have great utility values. In addition, buildings are creators of identity and help give places their distinctive character.
Principles for taking good care of old houses
- It is better to maintain than to repair, it is better to repair than to replace. Although old original materials may look degraded, they are often in far better condition than first impressions would suggest. They will most likely also last longer than new building components.
- Do as little as possible and preserve and restore the building’s original components.
- It is okay that old houses look old. Preserve building components that show wear and tear – these are part of the building’s history.
- Use traditional materials, structures and methods. Traditional materials go better with old materials and building components.
- Choose quality over short-term solutions. Do things correctly right from the start and they will last much longer.
- Try to solve new functional requirements by taking advantage of the building’s inherent possibilities.
- Make sure new solutions match the building’s expression and technical prerequisites, both as a whole and in detail.
Buildings worthy of protection
Buildings may be protected, either listed pursuant to the Cultural Heritage Act or protected pursuant to the Planning and Building Act. If they have such legal protection, the municipality or the cultural heritage authority in the county (in the Cultural Heritage Management Office in Oslo) have an overview of the provisions that apply. Buildings may also be listed as worthy of preservation, for example the Cultural Heritage Management Office in Oslo’s ‘Yellow List’. It is important to be aware of any restrictions that may apply to the building before planning any changes.
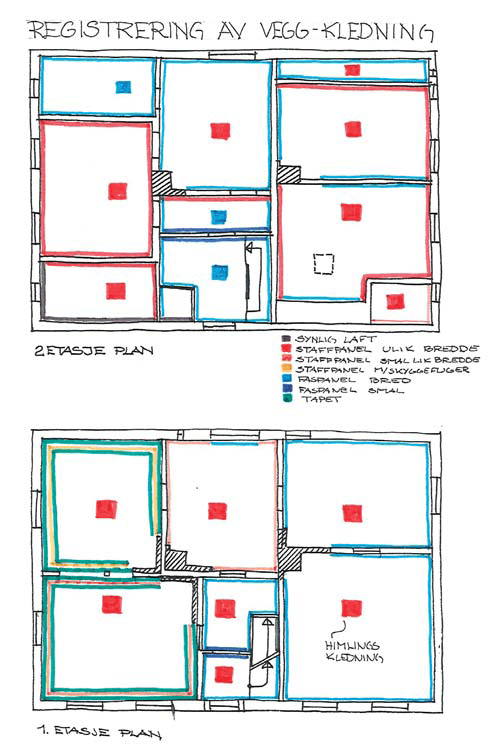
Culturally and historically important documentation
Culturally and historically important documentation consists of knowing the building’s history and structure, and not least of looking at ‘the current cultural and historical condition’. What has been preserved? What changes have been made? What components and surfaces are original or old? What is important to preserve? What can be highlighted and developed to make it even more attractive? A combination of technical, cultural and historical condition assessments will often provide a better overview than separate assessments. A technical failure may, for example, have occurred as a result of changes made over the years.
Planning
In order to plan energy saving measures, one should have a good overview of:
- How the house is constructed and the special factors one must take into consideration to avoid damage, such as moisture conditions in the cellar and inside the walls
- How the house is protected against external and internal moisture
- How the house works in terms of ventilation and heating
- How well the different parts of the building are insulated
- The technical condition
- Which building components and characteristics it is important to protect in order to safeguard the building’s culturally and historically important values
Simple measures such as sealing out draughts and repairing the windows can be implemented without having such an extensive overview. If more extensive insulation and airtightness measures are implemented, it is important to have control over their consequences.
The requirements stipulated in the Planning and Building Act shall promote sustainable development and ensure, among other things, good visual qualities and good technical execution that safeguards health, safety, the environment, energy and universal design considerations.
The requirements stipulated in the Act begin to apply to what the Act defines as ‘projects’. Projects such as new construction, extensions, changes in use or significant changes must be designed and executed in accordance with the requirements. Work that is not regarded as being a project pursuant to the Act does not have to meet the technical requirements. Such work might include things such as pure maintenance work.
When a project triggers the requirements in the Act, it is a prerequisite that the requirement is relevant, i.e. that it applies to the relevant part of the building, fulfils a function and has an effect on what the project involves. As a general rule, the requirements that apply to projects on existing building structures are limited to those parts of the structure to which the project applies. In the case of a major reconstruction or change of use, the requirements will generally apply to the entire building.
However, Section 31-2, fourth paragraph of the Act allows municipalities to grant permission for change of use and necessary reconstruction and renovation of existing structures, even if it is not possible to adapt the structure to today’s technical requirements.
The energy regulations in Chapter 14 of the 2010 Regulations on Technical Requirements for Building Works have a separate provision stating that if complying with the energy requirements is not compatible with the preservation of cultural monuments and cultural heritage values, the energy requirements apply only to the extent applicable, i.e. within what is advisable based on consideration for and desire to retain historical and aesthetic qualities in the structure.
Assessment of technical condition
Before carrying out an extensive project on a building, one should perform a condition assessment so that one knows how the house is constructed and the damage or weaknesses that exist. This should preferably be carried out by a professional.
The condition survey should include:
- registration of condition, incipient moisture, frost and rot damage and the causes of any damage
- registration of probable hidden damage and consequences if they prove to be real
- registration of conditions that affect energy consumption and indoor climate, such as airtightness and ventilation
- assessment of the risk associated with relevant energy efficiency measures
- need for maintenance and repairs
- need for further investigation
Standards – instructions
In practice, standards or instructions are often good tools both for the person carrying out the work and as a reference when ordering services. There are two standards that may be applicable: Norwegian Standard (NS) 3424 Condition survey of construction works and NS-EN 16096 Preservation of cultural monuments – Condition survey of buildings that are listed and worthy of protection.
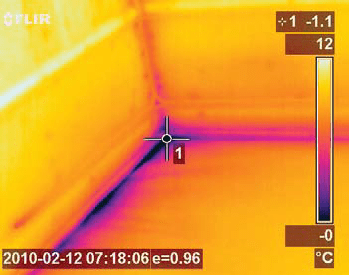
Thermography
Thermography and blower door tests can be good tools for getting an overview of a building’s airtightness and insulating capacity. Thermography gives a photograph showing the various surface temperatures. Thermography measures infrared radiation. This type of analysis can reveal cold bridges, air leaks and inadequate insulation.
Thermography can also be used to check the quality of additional insulation work. In some cases, thermography can also reveal water accumulation and wet areas.
Thermography normally requires an indoor and outdoor temperature difference of at least 10C°. It is important that the thermography equipment is calibrated to register the highest and lowest temperatures. The scale must not be so sensitive that very small temperature differences appear, because this is irrelevant regarding heat loss.
Blower door tests
If one suspects that the ventilation in the house will be too low if one seals and/or insulates the house, one should check the ventilation level and air leaks in the building to ensure that the rate of air circulation is adequate. In a building that has extraction ventilation only, the air has to enter through the outer structures, and there may be insufficient air circulation if the building is too airtight.
The risk of physical damage to structures and poor indoor climate
Humidity and temperature
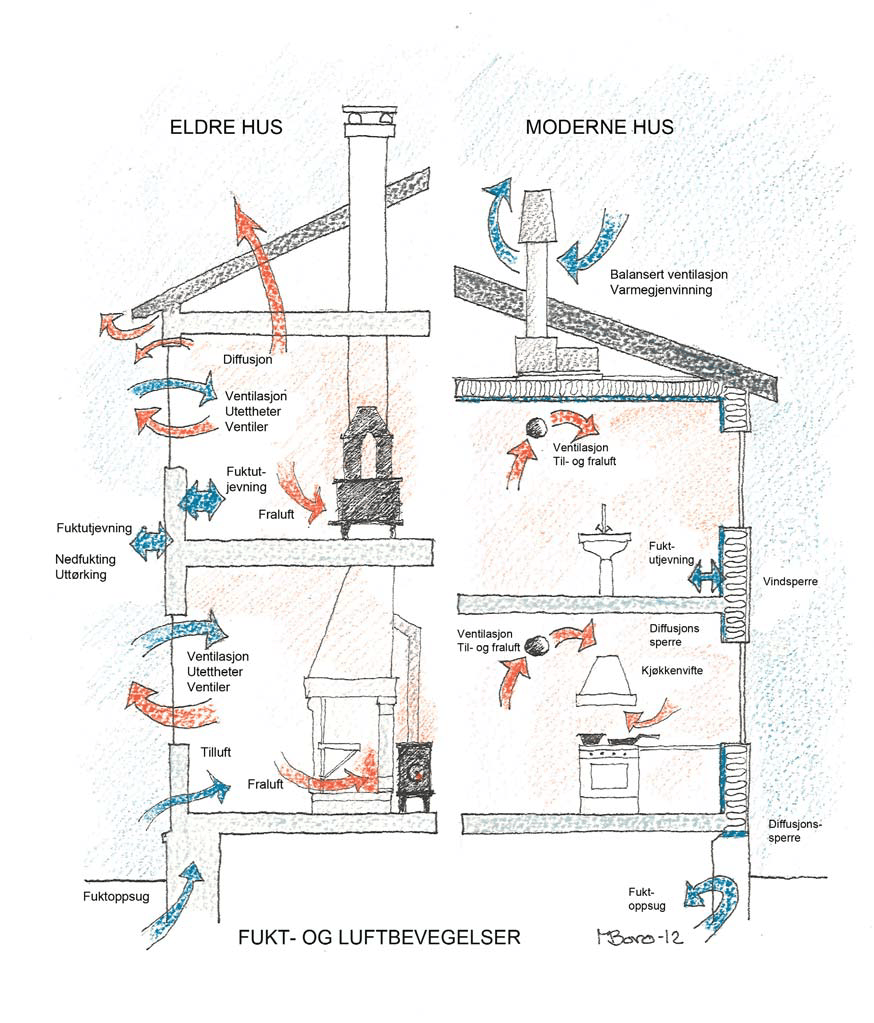
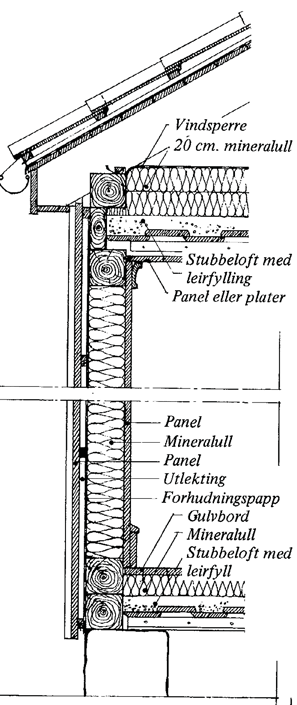
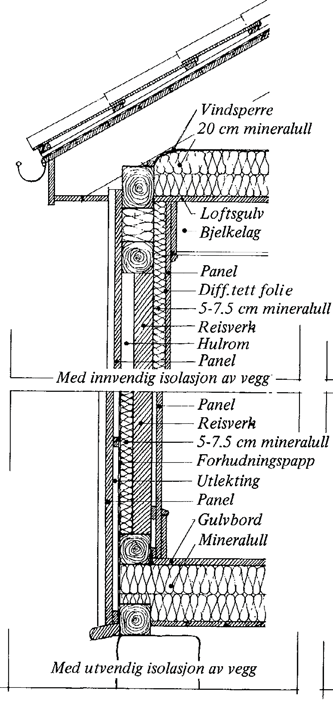
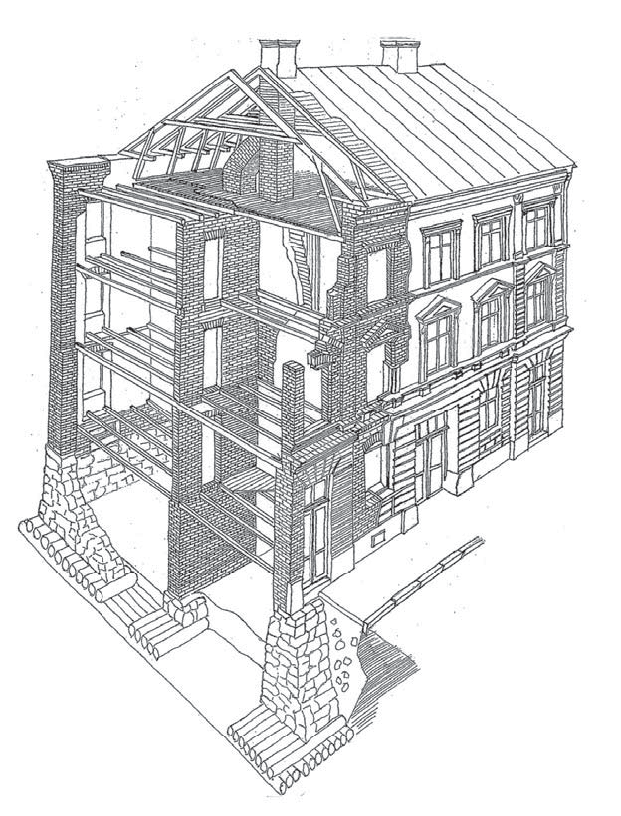
When we implement energy-saving measures, we change the physical conditions (humidity and temperature). Over time, this may cause damage to the building. Therefore, we need to know the structure of the house, understand how the structures work and assess the consequences of any changes that are made. It is especially important to know that old and new building technologies are very different; see the illustration on the previous page. The use of modern solutions and the use of materials can lead to damage.
Some building components depend on a certain amount of internal heat input to avoid structural damage. When fitting additional insulation on the warm side of a structure, this heat input is reduced, and the risk of condensation and accumulation of moisture outside the layer of insulation may increase. On the inner side of the layer of insulation, the temperature is higher and moisture conditions usually improve. Especially in older building components that are sensitive to variations in
moisture, or that already have a moisture problem, one should be cautious about implementing insulation measures on the inner side.
The thicker the insulation layer, the colder the outer parts of the insulation will be, and there will be a risk of condensation if the humid indoor air leaks out. It is difficult to say how thick the insulation layer can/should be between a warm room and a cold attic. It depends on how airtight the ceiling is and how airtight the openings (vents etc.) in the floor are. Calculations show that for a two-storey, detached log house that has a traditional attic joist floor insulated with pugging, 15 cm of additional insulation will give the building an energy reduction of 8%, while 30 cm of insulation gives a 9% reduction. This shows that there is most to gain from the first few centimetres. Source: SINTEF/NIKU
Ventilation and indoor climate
Ventilation in older houses is usually based on ‘natural buoyancy ventilation’. The driving forces in the extraction system are wind and the thermal buoyancy of the indoor air. The thermal buoyancy occurs because warm air is lighter than cold air and therefore rises up. The air exits through the extraction ducts in the chimney and through air leaks in the upper part of the house. Buoyancy is greatest during winter when it is colder outside. Fresh air is supplied through vents and small openings in the building structure, and by opening the windows. Using a wood-burning stove or open fireplace also contributes to ventilation, because air exits through the stove/chimney and fresh air is drawn into the house. The thermal buoyancy will be weaker during the summer months, but it is then more acceptable to ventilate by opening the windows.
A good indoor climate is important for users and for the house. Sometimes the ventilation is insufficient in old houses, but usually it is too powerful. We pollute the indoor air with moisture, exhaled air (CO2) and particles. We breathe, cook food and dry clothes. Furniture, carpets, electrical equipment and paint emit gases. Moisture can lead to mould and rot damage. In order to transport moisture and contaminants out of the house, there is a need to replace indoor air with fresh air from outside.
There is a debate as to what constitutes adequate air circulation. Current regulations for new buildings stipulate strict and clearly defined requirements regarding air replacement. So that this doesn’t lead to large energy losses, heat exchange is required so that the heat from the air on its way out of the house is used to heat the air that is on its way in, or to heat the hot water. This requires controlled ventilation (ventilation systems) and airtight houses. Measuring the relative humidity is easily done with a moisture meter. Recent studies show that moisture-controlled ventilation can reduce energy demand and loss while also maintaining satisfactory indoor air quality.
When we make our houses airtight, the natural buoyancy ventilation decreases. This is not often a problem because we don’t make houses completely airtight; the house will still leak enough air for us to achieve a good level of insulation. However, it will be necessary in some cases to establish vents that are evenly distributed around the house and mechanical ventilation extractors.
Bathrooms and kitchens are the rooms that are most exposed to moisture in homes. Mechanical ventilation extractors are often installed in these rooms, even in older houses. There are several types of ventilators one can use in bathrooms. The best types are often those that turn on automatically when the moisture reaches a certain level. A kitchen extractor hood extracts both cooking fumes and moisture.
In older houses with open extraction ducts to the roof, one can install a central mechanical ventilation system. However, time-controlled extraction fans in individual rooms/ducts are much simpler and cheaper. In buildings where air circulation has been low, central mechanical ventilation systems may result in greater heat loss from ventilation. A central mechanical ventilation system must always be designed and planned by an independent consultant (engineer), not by those who supply such systems.
Example – Cellar
In a slightly cold and damp cellar, the heat leaking from above can help to heat and dry out the cellar so that the humidity remains at an acceptable level and the temperature is kept above the critical level. If we insulate the floor above this cellar, it can cause the cellar to become colder and damper so that mould and rot sets in, and it can cause it to become so cold that the water pipes freeze.
Example – Exterior wall
If we insulate the inside of a wall, the outer wall will get colder. It will take longer for the moisture in the wall to dry out. This is especially the case for north-facing walls. Brick walls will be most sensitive to such changes.
Stresses caused by the climate
A cold and dry inland climate places completely different demands on buildings compared to windy, humid coastal climates with a lot of heavy rain. Local building traditions in Norway take into account the different climatic zones. We can learn a lot from our traditions when it comes to building materials, technical solutions, placement and organisation. We should learn from these lessons, both in the construction of new buildings and maintenance of old ones. When improving energy efficiency, it is very important not to reduce the building’s ability to withstand stresses caused by the weather.
Vapour barrier
The use of plastic as a vapour barrier when fitting additional insulation is a major topic of discussion. Modern building technology is based on airtight and well-insulated outer layers, with a vapour-tight inner layer and an external layer that allows vapour to escape. If there is damage to these types of extremely airtight and well-insulated building components, the moist indoor air can penetrate the building components without them having sufficient opportunity to dry out. This can quickly cause damage.
Most older houses built before 1950-60 do not have vapour barriers. Often, internal surface layers such as wallpaper and paint function as sufficient vapour barriers combined with a relatively large outward heat flow. Water can get in, but it has the possibility of drying up. For old buildings, the introduction of a vapour barrier will mean a major change in the movement of moisture in various building components. It will also be much more difficult to achieve good
vapor barrier airtightness at the transitions between the building components of an old house than when building a new one. Therefore, leakage points will often occur.
Today, the air inside most homes is fairly dry. Households are simple with little moisture production, unlike in the past when laundry and a lot of traditional cooking involving long periods of boiling produced a lot of moisture. Experience tells us that as long as you do not insulate too much in the attic, it will usually be fine not having a vapour barrier in rooms such as kitchens with extraction over the stove, and bedrooms and living rooms. Internal cladding and panelling will help to seal things so that the amount of moisture that penetrates the wall or joists is not so great. In rooms with a high moisture load, such as bathrooms, it is important to have a vapour barrier and good ventilation.
Choice of materials
Traditional building materials are generally less processed and require less energy to produce than modern ones, and therefore have less greenhouse gas and environmental impact.
In the early 1900s, various materials that only had an insulating function were used in the walls. A characteristic of insulation materials up to the 1950s was that they were hygroscopic. Hygroscopic materials are materials that are able equalize moisture levels; they can absorb and emit moisture in the form of water vapour. Mineral wool does not have hygroscopic properties. Hygroscopic materials are able to release moisture back into the air more easily than materials such as mineral wool. In any case, it is important that the moisture load is not too great over lengthy periods of time so that moisture does not accumulate resulting in fungal growth and rot damage. Toxins are added to several types of organic insulation to prevent fire, fungal growth and pests. Therefore, be aware when choosing the type of material.
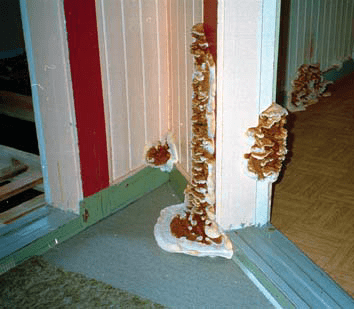
Mineral wool has been shown to lead to the reemergence of old infestations of dry rot because it contains minerals the fungus needs to grow. The fungus has the ability to fetch water through its mycelial cords from a moisture source located several metres away. Dry rot can cause extensive rot in wood and spread rapidly in wood and adjacent masonry.
Gypsum/plasterboard is a problematic material with regard to mould if the material is exposed to moisture. Mould can lead to allergies and chronic respiratory infections. Therefore, do not use gypsum/plasterboard where there is a risk of moisture, such as in a cellar.
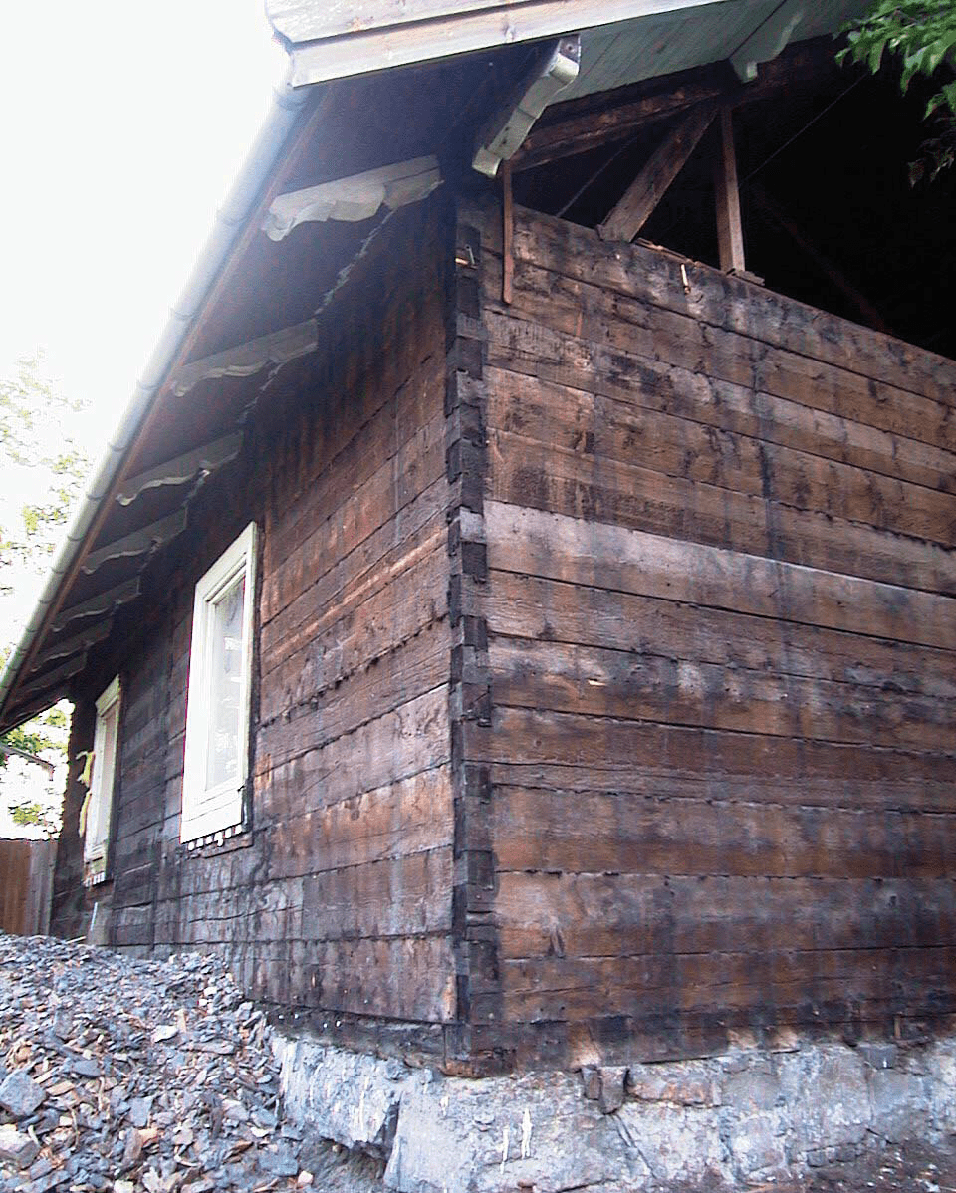
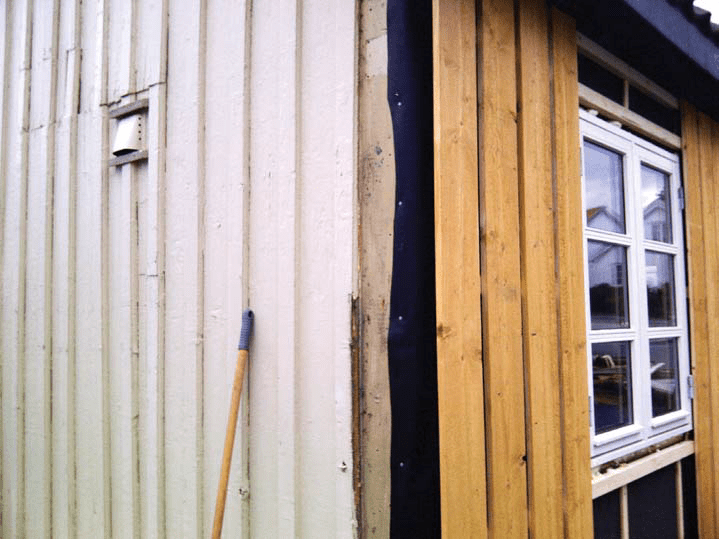
Farmhouse in Kvinesdal – Restored to its former grandeur and improved energy efficiency
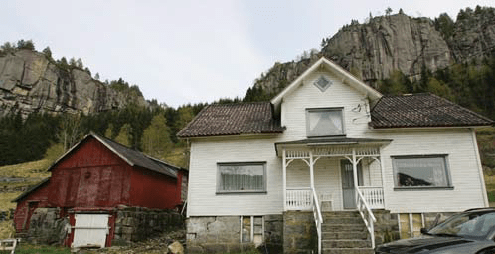
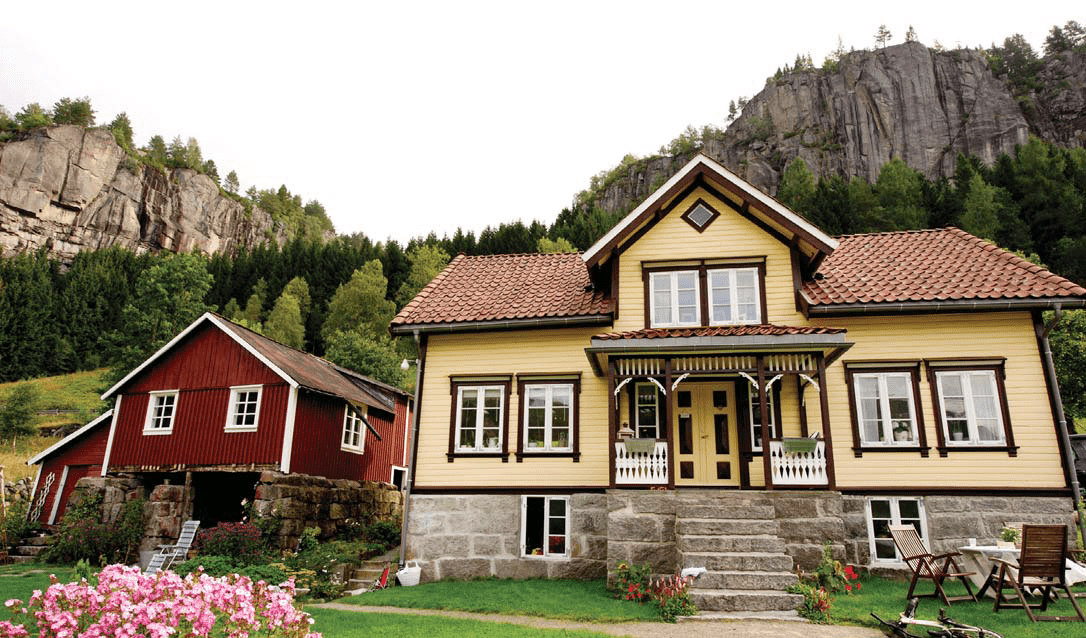
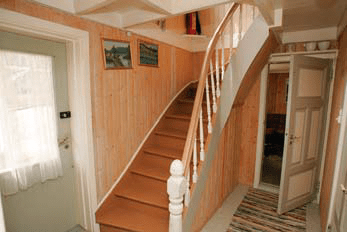
What has been done?
For a building like this, there are several energy efficiency measures that can be implemented without the building losing its character and historical value. The most important measures will be making the house airtight and watertight, fitting insulation over the cellar and above the ceiling under the attic, as well as improving the windows.
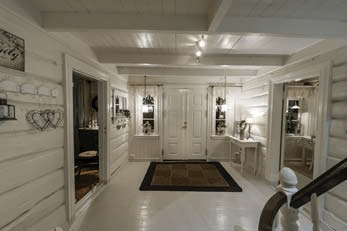
Most of the exterior walls have 5 cm of interior insulation, but some of the log walls are currently without insulation. Where original interior wall surfaces were preserved, they have been restored and painted. Many layers of boards, wallpaper and panelling have been removed. The parts of the walls that were a ‘patchwork’ have been repaired where needed and insulated where there were cavities.
The cellar walls are not insulated, but they are cavity walls with earth packed between them. Underfloor heating has been installed in the cellar and on the ground floor. The cellar floor was lowered and a new foundation was laid with underfloor heating pipes.
The cellar holds a constant temperature both in the summer and winter. The cellar has a room measuring 3 m2 which houses the heat pump and accumulator tank. The heat pump collects heat from geothermal energy. Approximately 500 metres of pipes have been laid which is sufficient to heat the 230 m2 house. The heat pump uses 2.2 kilowatts and gives back approximately 6. Firewood is also used to heat the house when needed.
Drainage has been dug around the entire house and drainage pipes have been installed that carry water away from the roof.
The roof boards have been repaired and waterproofing and furring strips fitted. Finally, old roof tiles have been reused from a nearby barn. The attic is insulated with 2×15 cm insulation above the 1st floor. The 1st floor also has four small rooms with pitched roofs and insulated jamb walls that.
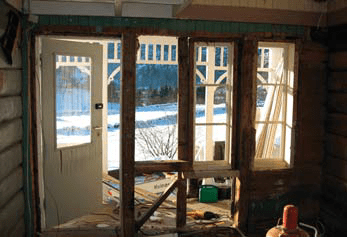
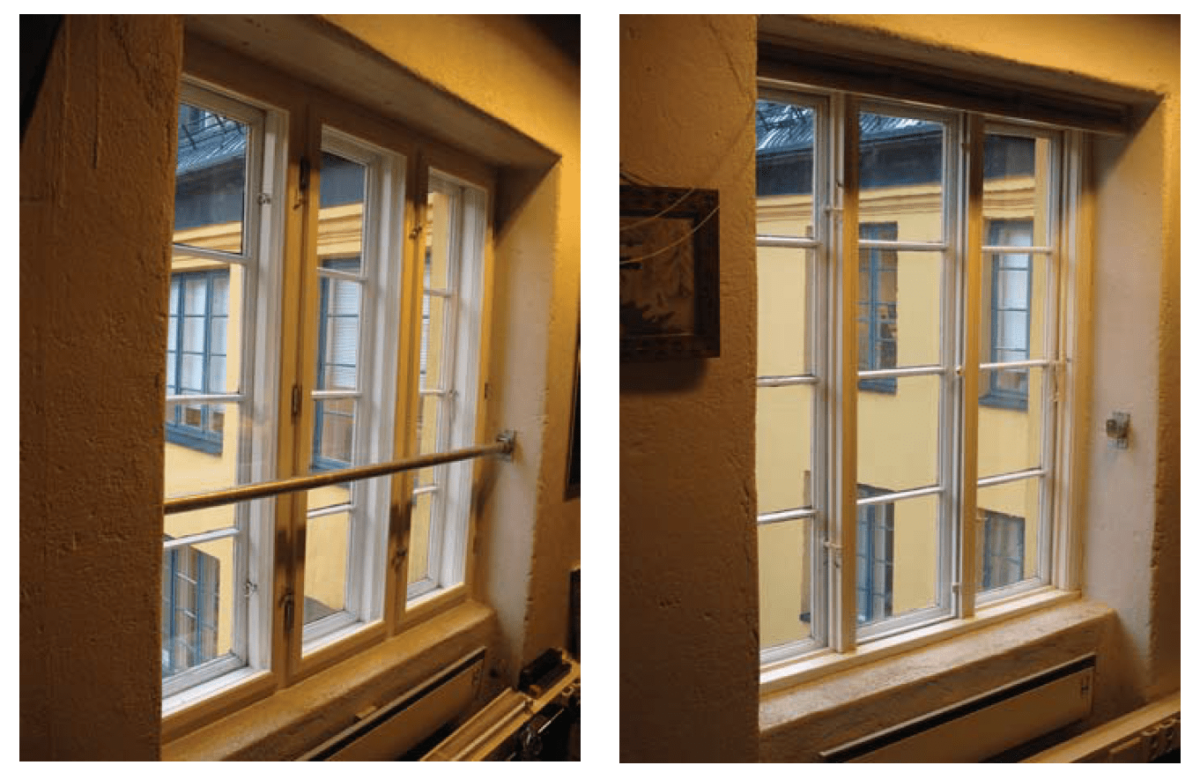
The windows are copies of the original ones, but with internal coupled frames to improve insulation. The profiles are not exactly the same, but quite similar.
3Energy-saving measures
Prioritisation of projects
The sequence of projects should be determined by what is most considerate for the building and what provides the most energy savings. As a general rule, an appropriate sequence would be:
- temperature control
- sealing (making airtight/watertight)
- repairing windows
- additional insulation of floors and ceilings
- additional insulation of walls
The sequence of projects also depends on the condition of the building. If there is a need for major maintenance work, this should always be combined with energy-saving measures. This will make the projects more cost-effective. Some energy-saving measures have a good effect but reduce the culturally and historically important values to such an extent that they are not recommended.
Where does the heat escape?
It is useful to know through which parts of the building the most heat escapes. The figure below shows how the heat loss is distributed between the various structural components of a two-storey, framed detached house. See separate information sheets on heat loss and improvement of energy efficiency for different building types on the Directorate for Cultural Heritage’s website.
All data on this and the next page are taken from the report ‘Improving energy efficiency in existing buildings’, prepared by SINTEF and NIKU and commissioned by the Directorate for Cultural Heritage.

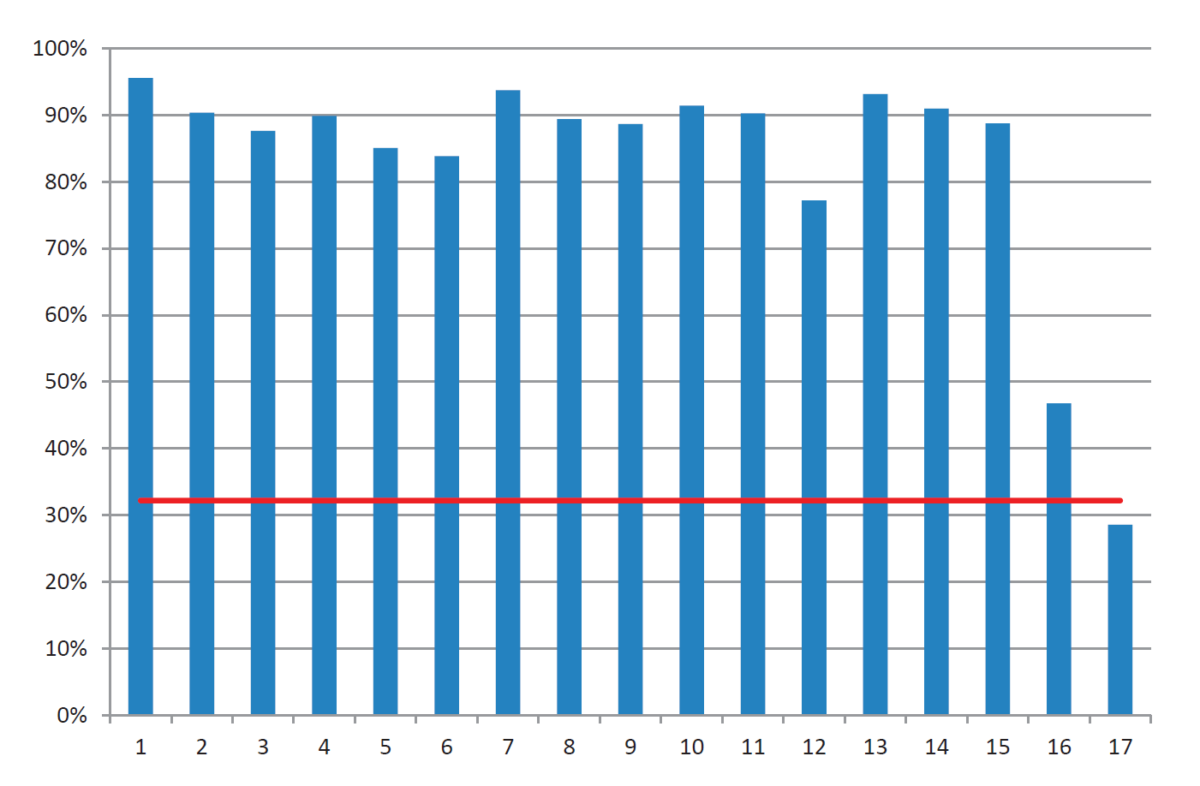
Which measures provide the most energy savings?
The table below shows the percentage reduction of net energy demand for the heating of various measures. The net energy demand includes the energy consumption for heating, hot water, lighting and technical equipment.
The table reads as follows: the blue columns are different energy measures. If Measure 1 is implemented – night time reduction from 21°C to 19°C , the net energy demand will be 96% of what it was before the measure was implemented.
Explanations regarding the above table:
Measure 1: Night time reduction from 21 to 19 C
Measure 2: Measure from an infiltration of 10 to 5 h-1 (n50) (halving)
Measure 3: Sealing from an infiltration of 10 to 2.5 h-1 (n50) (current requirements)
Measure 4: Wall – Additional insulation involving 50 mm in all interior walls., 0.03 cold bridge.
Measure 5: Wall – Additional insulation involving 100 mm in all exterior walls
Measure 6: Wall – additional insulation involving 150 mm in all exterior walls or blow in insulation in addition to insulating with 100 mm exterior.
Measure 7: Floor above cellar – Blow in insulation over the pugging in the double floor.
Measure 8: Floor above cellar – Replace pugging and fill cavities with mineral wool
Measure 9: Floor above cellar – Remove the pugging and fill the cavity with new insulation and fit 200 mm of additional insulation on the underside.
Measure 10: Ceiling below the attic – 150 mm of additional insulation above, retain the pugging.
Measure 11: Ceiling below the attic – 300 mm of additional insulation above, retain the pugging.
Measure 12: Combined floor above the cellar and ceiling below the attic – 300 mm of additional insulation in the floor and ceiling
Measure 13: Windows – Replace secondary glazing – exterior single glazing, internal insulation pane*
Measure 14: Windows – Improve coupled windows – Exterior single glazing, internal insulating pane*
Measure 15: Change windows or secondary glazing – according to new data from SITEFS survey (see chapter on windows)
Measure 16: Combined measures. Measures 1,2,4,12, and 13. With regard to culturally and historically important values.
Measure 17: Combined measures. Measures 1,3,6,12,15 and balanced ventilation with heat recovery. Without regard to culturally and historically important values.
*Measures 13 and 14 have not been updated according to new research results. See Measure 15.
Temperature control
We don’t need the same warmth in a hallway as we do in rooms where we sit still. Closing doors between different temperature zones is by far the most effective form of saving energy.
A heating system that regulates night and day temperatures involves reducing the indoor temperature during the periods when there is no need to maintain a room temperature. As a rule of thumb, the energy demand for heating increases by around 5% for every increased degree of indoor temperature.
Lowering the night temperature will be most beneficial in buildings with lightweight structures. Log walls and brick walls are heavy structures
that have a large thermal mass, i.e. they are ‘slow’ – they have a great ability to store heat that is then emitted over a long period of time. It is important that such heavy structures are not insulated on the inside.
Risk
Temperature control can cause large fluctuations in the building’s relative humidity. This can cause damage to interiors or ornamentation that may require a special climate. For example, the climate around older, painted wood should not fluctuate or be overly dry. If there is special interior or ornamentation worthy of preservation in a building where the climate will undergo major changes, a conservator or other person with equivalent specialist expertise should assess the risk of damage.
Sealing (making airtight/watertight)
Sealing air leaks is cheap and saves energy. Much of the heat loss in old buildings is due to infiltration. When there are many air leaks and the air velocity is high, this is perceived as a draught. Reducing draughts increases comfort, and it is possible in many cases to do this without major interventions or changes to the building. Draughts can often be confused with so-called ‘heat transfer’, which can occur close to cold surfaces (for example by a window) in a warm room. It is important to map how much of the heat loss is due to leaks and the possibilities for solving this before any major insulation measures are initiated.
Draught problems are usually associated with transitions between walls and other building components such as foundations, windows, doors and floors, between frames and sills in windows and doors, and around recesses for chimneys, attic hatches and ducting. Problems with air leaks through wall structures can also occur, especially through walls that do not have any windbreak membrane fitted.
Sealing (making airtight/watertight)
- prevents cold air from penetrating the insulation and thus reducing its insulation capacity
- prevents water vapour and moist indoor air from penetrating the floor under a cold attic
- prevents dust and particles from insulating material from falling into the room
- improves thermal comfort
- provides better soundproofing
Measures
Sealing floors and transitions to other building components
Description of the work
Repair leaky hatches/vents leading to cold attics/cellars.
Dismantle mouldings/cornices around ceilings and floors, and seal with sealing strips along the wall-ceiling and wall-floor transitions, possibly with an angled rubber strip between the floor and wall.
Fill cavities between joists near the outer walls. If the insulation or pugging does not fill the entire cavity in the floor and there is a deficient windbreak membrane in the wall, cold air can enter the cavities between the joists above the insulation and the cold air will cool the entire floor. Even if it is not possible to seal the windbreak membrane, this measure will help. (Building Management 722.506 (in Norwegian))
Risk
When dismantling original panelling or mouldings, it is important to be careful so as to avoid damage. However, there is a risk that some original building components will be lost.
Measures
Sealing windows and doors
Description of the work
Remove the moulding from around the window add insulating material in the space between the frame and the wall structure.
Openings between window sills and window frames and in door leaves can be rectified by inserting silicone sealing strips that have a V or P profile. If the joint between the frame and the sill is too narrow, an alternative may be to use mouldings that sit tightly to the substrate or to countersink the joint to make it wider. For windows that have secondary glazing, it is important to make sure that there is a good seal between the inner window and the main window.
Risk
Loss of original materials, see above.
Measures
Sealing floors and transitions to other building components
Description of the work
If you are replacing the exterior wooden cladding, it is a good idea to install a windbreak membrane. This prevents a lot of draughts getting into the house and the insulation capacity being reduced due to cold air penetrating the insulation. Sometimes it may be appropriate to remove the wooden cladding, establish a windbreak membrane and then reassemble the cladding.
Risk
Loss of original materials, see above.
Fitting additional insulation in the floor above cellars
As a rule, insulating the cavities between floor joists above the cellar will significantly improve comfort. This also makes it possible to lower the room temperature somewhat without it feeling colder.
When fitting additional insulation in the floor over a cellar, the cellar will become colder. Cold air is not able to retain moisture as much as warm air. Therefore, when the temperature is lowered, the relative humidity rises. A lower temperature also means things take longer to dry out. Fitting additional insulation also often leads to increased airtightness so that the ventilation of the cellar is reduced. When the basement becomes damper in this way, it can lead to mould, rot and damage to structures. It can also increase the need for frost protection in the cellar. Therefore, make sure that the cellar is ventilated and has some level of heat supply.
| Measures | Description of the work | Risk |
| Additional insulation on the underside of the floor over the cellar | This measure is beneficial where no ceiling has been installed under the floor joists and where access is easy under the entire floor. It may also be appropriate to lower the ceiling to make room for thicker layers of insulation. However, this will result in a lower ceiling height in the cellar. By lowering the ceiling, the surface temperature on the underside of the joists will be higher, and the risk of moisture damage will be reduced. This will also make it easier to install a windbreak membrane. | Increased moisture and lower temperature in the cellar – see introductory paragraph. |
| Additional insulation in the cavities / between the joists | As a rule, fitting additional insulation in structural cavities is simple. It can have a great effect if the cavity is large enough. An alternative to get more space for insulation would be to dismantle part of the floor and suck out the existing pugging.
Some of the infiltration loss may be due to cold outside air entering through the outer walls into the cavity above the pugging. See the chapter on sealing. The cold air will then cool the entire floor. It is therefore important to stop the cold air from entering the joist cavities. Insulating the floor cavities to the outer wall could have a great effect. Old cellar walls tend to be thick so that it is difficult to gain access below to fit additional insulation over the cellar wall. A good alternative is then to spray insulation into the cavities, but be aware that the insulation must not come into contact with damp cellar walls as it could absorb moisture |
Increased moisture in the cellar – see introductory paragraph.
Blowing insulation into cavities is often done without having to open them up and check the technical condition. It is recommended to open cavities at critical locations for inspection before blowing in insulation. If damage is found, it should be repaired and careful consideration should be given as to whether blow-in insulation will entail a risk of further damage. Removing the pugging will make the joisted floor lighter and sound insulation may become poorer. Removing the pugging also removes original material that may have culturally and historically important value. |
| Additional insulation on the upper side of the floor over the cellar | Additional insulation on the upper side of the floor may be appropriate in connection with other improvements, for example in cases where the floor needs to be repaired or reinforced | Increased moisture in the cellar – see introductory paragraph.
Additional insulation on the warm side of a structure entails a lower temperature in the original structure and thus a risk of condensation formation and moisture damage. The floor will be higher than it used to be. This will change the proportions in the room and may require you to move or, in the worst case, remove valuable mouldings, wainscotting, doors, etc. Original floorboards and skirting boards will often be lost. |
Fitting additional insulation in the floor below cold attics
If you have a cold attic, it is a good idea to fit additional insulation in the attic joist floor and keep the roof structure cold and aired. It is usually easiest to lay a new layer of insulation on top of the attic joist floor. Another solution is to blow insulation into the cavities above the pugging or to combine these two.
Fitting additional insulation will lower the temperature in the attic, and the risk of condensation forming will increase. To reduce the risk of condensation, good ventilation must be ensured.
In attics that have had additional insulation fitted, mould will sometimes form on the underside of the outer roof above attic doors or hatches. This is due to the condensation of the moisture in the air that enters through openings around doors/hatches. Additional insulation must therefore always be combined with sealing of hatches and doors.
A colder attic can contribute to less snow melting on the roof, increasing the weight of the snow. At the same time, this will reduce the formation of icicles on the cornice.
| Measures | Description of the work | Risk |
| Additional insulation on the upper side | This measure results in few cold bridges and provides little risk of condensation and moisture problems. The floor below a cold attic should be fitted with additional insulation over the entire floor surface. (Building Management 725.403) | Airtightness is very important when fitting additional insulation under a cold attic. The warm indoor air contains moisture that will condense if the air escapes through the floor and into the attic. One must therefore consider whether the ceiling is sufficiently sealed so that warm and moist indoor air does not escape through openings.
The Directorate for Cultural Heritage recommends no more than 20 cm of insulation below an attic floor. If thicker insulation is fitted, there is a risk of condensation and rot damage. For brick houses, it is important not to fit insulation around the point where the roof structure joins the walls. This is a point vulnerable to leaks and often difficult to check. |
| Additional insulation in the cavities / between the joists | As a rule, fitting additional insulation in structural cavities is simple and gives a great effect if the cavity is large enough.
In order to fit sufficient insulation into existing cavities, the existing pugging can be removed to accommodate a thicker layer of insulation |
Airtightness is very important when fitting additional insulation under a cold attic. See above comments.
Removing the pugging will make the joisted floor lighter and sound insulation may become poorer. For brick houses, particular consideration must be given regarding consequences for the ends of the joists that are located in the outer wall. |
| Additional insulation on the underside | Joisted floors below attics can also be fitted with additional insulation on the underside. | The additional insulation will change the temperature conditions so that the parts that remain outside the insulation layer will be colder and drying out will therefore take longer. This increases the risk of moisture damage. NB! For brick houses, particular consideration must be given regarding consequences for the ends of the joists that are located in the outer wall.
The measure will result in a lower room height. Ceilings with plaster moulding/coving or ornamentation may have great cultural and historical value and should not be damaged or removed. When fitting insulation on the underside, any ceilings, wood, plaster ornamentation etc that are worthy of preservation can be carefully dismantled and then reassembled after work has been carried out. |
Additional insulation of walls
Additional insulation of external walls has a good effect, but it can alter the facades or interiors of the house so that we lose cultural and historical values. Additional insulation of walls can be economically very costly compared to the energy saving gains one gets. In practice, such measures are therefore most relevant on walls where there is already a need for renovation.
In many cases, walls in old wooden houses are suitable for the fitting of additional insulation. It is far easier to achieve good solutions in wooden houses than in brick houses.
Wood is an organic material that is decomposed by various harmful organisms when temperature and moisture conditions are favourable. An old wooden structure
that has stood for many years in ‘natural’ draughty conditions can develop major rot damage in just a few years if the natural airing of the structure is hindered by incorrectly executed additional insulation and sealing.
Bricked half-timber walls are very susceptible to rot damage, and one must be very careful about changing moisture and temperature conditions when fitting additional insulation. Changes should not take place without consultation with the cultural heritage authorities.
Cellar walls:
| Measures | Description of the work | Risk |
| Exterior insulation of cellar walls below ground level | If the terrain around the building is to be dug up in connection with drainage, external insulation of cellar walls below ground level should also be considered. The measure does not have a major impact on energy demand, but it improves moisture conditions and the indoor climate of the cellar. This reduces the risk of future physical damage to structures.
Replacing or improving interior drainage will not stop capillary suction of moisture in the cellar walls. It is important to ensure ventilation and some heating to limit moisture levels |
The cellar foundations may be laid on surfaces located below the groundwater level. Take care not to disturb the foundations, and not to dig below the groundwater level. This might lower the groundwater level so that raft foundations are exposed to air and eventually rot. |
| Internal insulation of walls below ground level | In old buildings, walls below ground level are exposed to moisture from outside or from below. They are therefore rarely suitable for additional internal insulation. | There will be a high risk of moisture accumulation on the backside of the new framing/insulation and therefore mould and rot problems. |
| Innhold |
Brick walls:
| Measures | Description of the work | Risk |
| Exterior insulation of brick walls | By fitting additional exterior insulation, the original structure will be warmer and the risk of frost damage will be reduced. By installing this type of additional insulation, one avoids cold bridges along floors and adjacent interior walls. The windows should be moved further outwards to retain the original facade expression.
The choice of insulation system in brick houses must be assessed based on the prerequisites of each individual house. |
The measure leads to the loss of original building components. The street facades of old brick houses are often beautifully decorated. Natural stone sections, cornerstone masonry, ashlar masonry, stonework around windows and cornices will be lost. In addition, the placement and design of details such as flashing, gutters and downspouts often need to be changed.
Backyard facades and gables are usually simpler in design, and in some cases they can be insulated externally without major loss of cultural and historical value. The thickness of the insulation layer will determine the extent to which the facades change. Additional exterior insulation changes the proportions and appearance of the house. The relationship between the wall and cornice, foundations and windows changes. |
| Interior insulation of brick walls | Additional interior insulation will not affect the external facades, but it requires extensive adaptation inside the house.
One should never use more than 50-75 mm of insulation (Building Management 700.601). Undamaged wall sections that have been cold for a long time can normally withstand some additional internal insulation. |
By fitting additional internal insulation, the original exterior wall loses its natural supply of heat from within. As a result, the temperature decreases in the outermost layer and moisture from heavy rain etc. is not able to dry out as quickly as before. This increases the risk of frost damage and the flaking of bricks and rendering. It also increases the risk of rot damage developing in floor joists that are bricked/cemented into the outer wall and in the eaves.
Additional interior insulation should only be chosen after careful consideration of the risk of physical damage to structures. The moisture and temperature conditions in the wall should be analysed, and the condition of all wood that has been bricked/cemented in place and the brick’s frost resistance should be surveyed in order to assess the risk of damage. Be aware that condition and risk can vary from wall to wall in a house, and between the upper and lower sections of the same wall. Additional interior insulation will result in cold bridges along floors and where interior walls meet the outer wall. It is also very difficult to ensure good sealing in these transitions. As a result, the moisture inside the house can escape from these places. This can lead to condensation, and mould and rot growth. Additional interior insulation of brick houses with concrete floors has a limited effect because this does not solve the problem of cold bridges along the floors. Internal area will be reduced. The interior will be altered and original building components may be lost. Window embrasures will be deeper, allowing less daylight into the rooms. Mouldings, panelling and wainscotting can be reassembled, but it must be done with great care to avoid damage. |
| Innhold |
Wooden walls:
| Measures | Description of the work | Risk |
| Exterior insulation of wooden walls | Additional exterior insulation is a technically good way of fitting additional insulation, but the walls will have to be extended outwards and thus the facades will be altered. Windproofing and exterior additional insulation are often chosen when the exterior wooden cladding is so poor that it has to be replaced anyway. Windproofing will reduce draught problems without having to change the facade. For panelled walls, it is usually advantageous to remove the existing exterior wooden cladding to prevent cold air from entering cavities along the panelling on the inner side of the insulation. (Building Management 723.511). The cavities in half-timbered walls and framed walls should also be fitted with additional insulation by blowing in insulation material. This will result in achieving the greatest possible insulation thickness and the least amount of open cavity space where cold air can be drawn in.
Experience shows that log walls, framed walls and old half-timbered walls have sufficiently vapour-tight layers. This means it is possible to fit additional exterior insulation without having to install a new internal vapour barrier. |
Additional exterior insulation changes the proportions and appearance of the house and also leads to the loss of original building components. The extent to which the appearance of the house is changed also depends on the insulation thickness. The wall has to be extended outwards so that the cornice protrudes less and the wall/foundation transition changes. If the windows are not moved out together with the wall, they will sit deeper in the wall.
When fitting additional insulation in exterior walls, one must consider whether there is a need for special measures to ensure good rain protection in the transition between building components. The exterior cladding, mouldings, downspouts, corner detailing, drip boards down to the foundation and cornice details will usually be lost. At best, they can be replaced with copies, but in practice this is difficult because the relationship between the building components changes. Additional exterior insulation will greatly change the character of log walls that don’t have existing exterior cladding. As the window embrasures get deeper, less daylight will enter the rooms. |
| Interior insulation of wooden walls | Additional interior insulation is often chosen to protect a well-preserved exterior.
By fitting additional interior insulation, one can insulate each room one at a time and limit the project to the rooms where the need is greatest, and one can also protect rooms with particularly valuable interiors. However, the solution does not protect against draughts along floors and partitions in the same way as exterior insulation does, and should be combined with other measures to remedy this |
Technically speaking, experience shows that interior insulation usually works on wooden houses. Additional interior insulation increases the risk of damage because the temperature in the original wall will be lower than before. This means that things need more time to dry out which thereby increases the wood’s moisture content. This can lead to the development of rot inside the wall structure. A condition assessment and possible improvement of walls, eaves and window framing should therefore be carried out before implementing such a measure. In addition, local climatic conditions should be taken into account. For particularly exposed walls, careful consideration should be given as to whether such a measure should be carried out. Vegetation such as shrubs and trees adjacent to the wall that prevent it from drying out should be removed.
To prevent hot, humid air from penetrating the wall, a vapour barrier can be installed on the inside of the wall. It is very important not to cover parts of the wall that are located between two vapour barriers. Painted boards and closely placed panelling will reduce the amount of moisture entering the wall. This means that a vapour barrier may be unnecessary. One must ensure that the structure receives sufficient ventilation from the outside. Good ventilation and negative air pressure in the house will reduce the risk of moist air being forced into the walls. See also the section on the choice of insulation materials. By fitting additional interior insulation, the interior area of the house will be smaller. Technical installations and fixed cabinets etc. must be moved. Window embrasures will be deeper, allowing less daylight into the rooms. Panelling, ceilings, floorboards, wallpaper, wainscotting and mouldings will often be lost when fitting additional interior insulation. Despite careful dismantling, these materials will often be damaged. In addition, the building components must be readapted because the relationship between the building components has changed. |
| Insulation of cavities in framed walls and half-timbered walls | Old, half-timbered exterior walls are particularly well suited for blowing in cavity insulation, provided that there is a waterproof/windproof membrane covering the panelling. As a rule, additional insulation of cavities in half-timbered walls is simple and gives great effect. Blowing in finely shredded mineral wool or cellulose fibre is a considerate way of insulating with regard to the preservation of original walls; both interior and exterior surfaces can be kept unchanged. The only visible intervention are wooden plugs in the panelling where the mineral wool is blown in.
It can be difficult to map all the cavities in the wall and ensure that the blow-in insulation is effective for the entire wall. This can be checked by thermography. Framed walls should only be fitted with additional blow-in insulation if a windbreak membrane is installed and furring strips added for ventilation behind the outer cladding. |
An advantage of blowing insulation into cavities is that you do not have to remove outer cladding/layers and open up the structure. However, you will not get an overview of any damage that may be present. We recommend opening up the structures and checking the ends of joists, the areas under windows, the lower part of the wall just above the foundation and other transitions. This is to make sure that there is no damage that can develop when the physical aspects of the building change after fitting additional insulation.
With regard to framed walls, the windproof/waterproof membrane will be fitted to the structure on the inside of the cavity. In other words, there will be no windproof/waterproof membrane between the cavity and the outer cladding. This means that there will be a great risk of the blown-in insulation becoming wet when it rains/snows. There will also be draughts/air movement in the insulation so that its insulation capacity is reduced. Such a solution is therefore not recommended. Furring extends the wall outwards, and this will change the relationship between the various building components and affect the overall architectural impression of the building. In practice, such a measure will very often lead to the loss of original building components. In places with a lot of heavy rain, there is a risk of damage to the cladding because it will take longer to dry out after becoming wet due to reduced heat flow from within. (Building Management 723.511) When blowing insulation into cavities, a vapour barrier will not normally be installed on the back of the inner wall. Therefore, the moist, warm indoor air can penetrate the wall structure. When the temperature in the outermost layer of the wall decreases, condensation can form. This can cause rot damage to develop. However, this happens very rarely in practice. There needs to be very humid indoor air for this to occur, which is rare in houses except in bathrooms. Interior wallpaper, boards, panels and layers of paint often provide sufficient watertightness and airtightness. Good ventilation also helps to prevent this. |
Windows
Homeowners are often advised to replace old windows. The Directorate for Cultural Heritage recommends upgrading them instead. Old windows are almost always made using high-quality materials, and they will most likely last longer than new ones.
Why take care of windows?
Windows play an important role regarding how one experiences a building, they give the building character. They tell stories about eras and styles. When old windows are replaced with new ones, the old windows’ fine wooden detailing and mountings disappear, and the unevenness of the old glass is lost. New windows tend to have larger dimensions and the area of glass is less. Part of the building’s historical dimension is lost. Every effort should be made to keep a house’s original windows. If one must replace the windows, the new windows should be the best possible.

Resource consumption and lifespan
Replacing old windows with new ones is not necessarily an appropriate environmental measure, even if the new windows provide somewhat better insulation. The lifespan of new windows is estimated to be around 20-30 years, while 100-year-old windows made of quality wood could last for another 100 years if maintained properly. Experience shows that many windows can be upgraded without major repair work.
In order to find out the best cost-effective option, there are many factors that need to be considered. It is not sufficient to compare the price of the cheapest factory-made window with the price of extensive restoration of old windows. The price of restoration depends on how extensive the maintenance/restoration of the old window will be. Sometimes, far too much restoration work is carried out, and this ends up being unnecessarily expensive.
For some windows, simple adjustments and new surface treatment may be sufficient, for others, there may be major rot damage that needs to be repaired. It is also the case that prices for such work vary greatly. We recommend that you get price quotations from several sources and preferably from craftsmen who live in areas where the demand isn’t that great. Prices for new windows vary greatly depending on detailing, and demolition/fitting costs are additional.
Sealing (making airtight/watertight)
Draughts can be caused by two factors, either openings where cold air enters, or heat transfer due to poor insulation, for example from windows with only a single pane of glass.
Openings between frames and sills can be rectified by carefully dismantling internal mouldings/architraves and pushing insulation between the wall and frame, then reassembling the mouldings.
Openings between walls and sills can be sealed by installing sealing strips. As a rule, rubber strips with O- or P-profiles are recommended. If the joint is very tight, it may be appropriate to mill grooves and then attach the sealing strips.
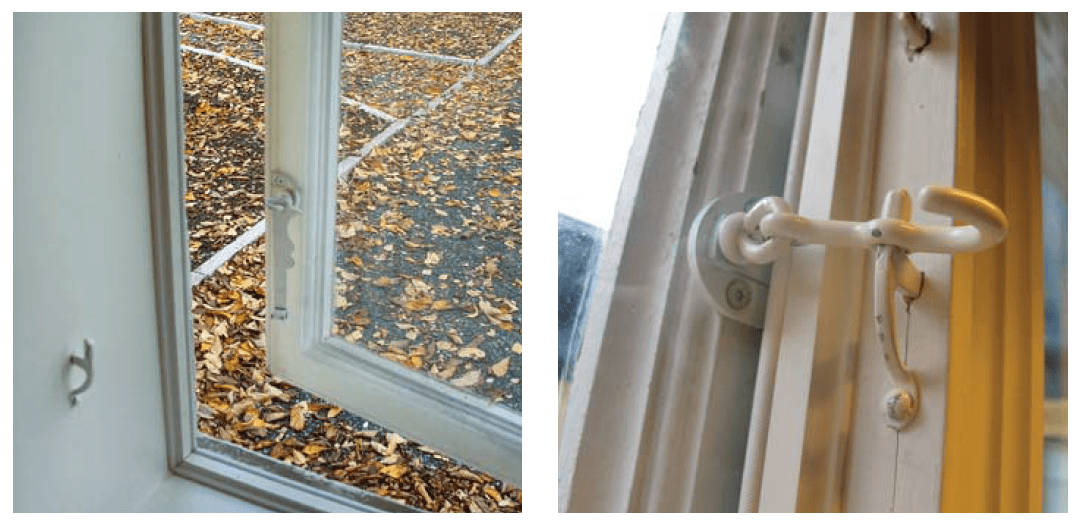
Openings around the secondary glazing can also lead to condensation. The warm and humid indoor air enters the space between the windows. Here, the air is cooled and has reduced moisture retaining capacity. Condensation often occurs on the cold, outer panes of glass. Sealing around the secondary glazing and window frames prevents this. Often, it may also be a good idea to improve/repair the closing mechanism.
Better insulation
Improving insulation capacity can be done by supplementing or replacing old glass with new glass that insulates better. If you have existing coupled or double-glazed windows, you can replace the glass in the innermost frame with energy-saving glass (single pane with a low-emission coating) or with an insulating pane (two panes of glass with a low-emission coating and filled with gas). Both of these alternatives will significantly improve the insulating capacity of the window. See separate information about this below. Installing or improving existing secondary glazing, are simple measures which can be far easier and less expensive than replacing the entire window.
If you have windows with old insulating panes, you should consider replacing these with modern windows that have far better insulation capacity.
Installing new secondary glazing inside can be a good alternative. Sometimes, old secondary glazing works poorly and may not be original. If you want to install insulating panes, the old secondary glazing frames will often not be dimensioned for this, or they won’t be sturdy enough to carry the heavier glass.
There are several alternative solutions for interior secondary glazing. One solution that may be particularly relevant where there are finely designed windows with internal profiles is to install an unframed piece of glass directly onto the old outer frame. This corresponds to a coupled solution so that the glass is hinged and can be opened for cleaning. This does not provide an insulation capacity as good as the measures mentioned above, but it may be a good alternative because its addition is hardly noticeable.
New windows
As a general rule, the Directorate for Cultural Heritage recommends that original or old windows worthy of preservation should be preserved rather than replaced. If the old windows are removed or are so bad that there is no point in restoring them, it is important that the new windows are adapted to the house and are good copies of the original windows. For buildings with high cultural and historical value, exact copies of the original windows should be made, possibly with new secondary glazing on the inside.
The new windows should have the same frame and frame width as the original windows. This means that the surface area of the glass will be the same. The windows should have the same handing and hinging as the original ones. Old windows often have drip moulds and profiles that give them completely different characteristics than the ‘flatter’ impression of modern, standard windows. It therefore goes without saying that such details should be recreated as they were
on the old windows. Putty should be used to fix the glass in place. The glass shouldn’t be cased in as is common today. The windows should have solid or integral glazing bars, not stick-on or face-applied glazing bars. The windows should have the same relationship with the wall/facade as the original windows, i.e. not installed further out from the wall or recessed further into the wall.
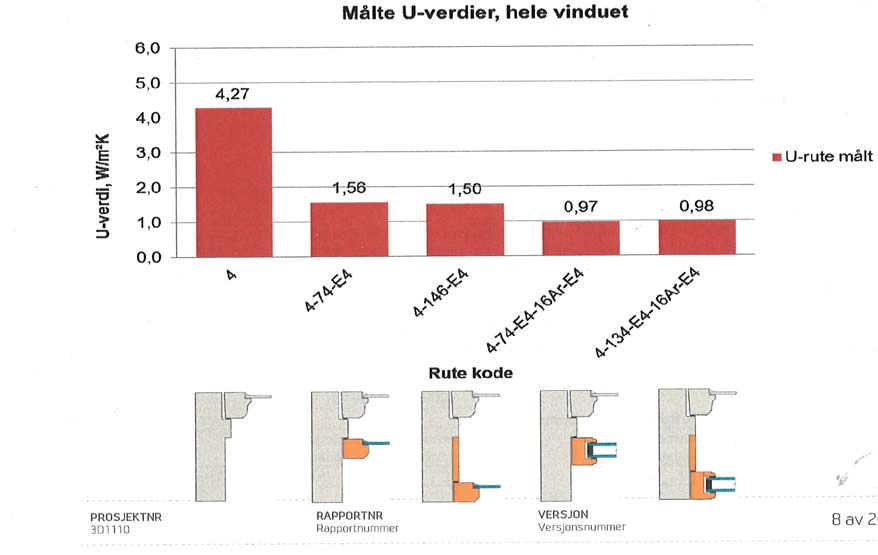
Insulating capacity of different types of window and glass
- Single-glazed windows: U-value 4.4
- Double-glazed windows with standard secondary glazing: U-value 2.6
- Window with energy-saving secondary glazing: U-value 1.6
- Low emission coated and gas-filled double-glazed windows with secondary glazing: U-value 1.0
U-value is a measure of a building component’s thermal insulating capacity – low value indicates high insulating capacity.
Source: Energy efficient windows with cultural value: measurements and calculations. SINTEF 2012.
New research results
In 2012 and commissioned by Enova and the Directorate for Cultural Heritage, SINTEF carried out testing of the insulation properties of upgraded traditional
windows. The results are available in the report: Energy efficient windows with cultural value: measurements and calculations. SINTEF 2012.
Here is a brief summary of the results.
The U-value of the five different types of window was measured in the hot-box at the SINTEF Building Research Design laboratory. “The measurements show that significant improvement in the U-value is achieved by improving an existing window with an extra pane of glass in a secondary glazing frame. With a double-glazed insulating pane in the secondary glazing frame, the U-value is lower than 1.0 W/m2K, which is on the same level as a new wooden window with a good triple-glazed insulating pane.”
In addition to the measurements, two different calculation methods were checked to find out how correct the answers are. The result shows that the simplified
calculation method, which is often used, shows poorer properties than the windows actually have. The advanced calculation method
provides answers that are far more correct.
The measured window is a traditional double-casement window with three panes in each casement. The U-values for other traditional types of window were calculated.
4Sources and literature references
The Directorate for Cultural Heritage’s website on energy saving www.riksantikvaren.no. All reports and information sheets below can be found on our website.
Reports
- ‘Improving energy efficiency in existing buildings’, report prepared by SINTEF and NIKU and commissioned by the Directorate for Cultural Heritage.
- ‘Greenhouse gas calculations for protected residential buildings vs. new low-energy buildings’, prepared by Civitas and commissioned by the Directorate for Cultural Heritage
- ‘More knowledge about improving energy efficiency in existing buildings’, prepared by Norconsult and Miljøanalyse and commissioned by the Ministry of the Environment
- ‘Energy efficient windows with cultural value – Measurements and calculations’, prepared by SINTEF and commissioned by the Directorate for Cultural Heritage
- ‘Fiin gammel årgang – guide to energy saving in buildings worthy of preservation’ (pdf ) Prepared by SINTEF with support from the Directorate for Cultural Heritage and others.
Information sheets
- 3.0.1 Know Your House. Log houses
- 3.0.2 Know Your House. Framed houses
- 3.0.3 Know Your House. Brick houses
- 3.0.4 Know Your House. Half-timbered houses
- 3.8.1 Window maintenance
- 3.11.3 Wood-burning stoves
- 3.16.1 Cog-jointed timber buildings. Example of energy saving
- 3.16.2 Half-timbered houses. Example of energy saving
- 3.16.3 Brick houses. Example of energy saving
- 3.16.4 Framed houses. Example of energy saving
Information on the environmental impact and life cycle load of materials. Statsbygg http://www.Klimagassregnskap.no
Old wooden houses – History, repair and maintenance. Tore Drange, Hans Olaf Aanensen and Jon Brænne ISBN 978-82-05-40143-3
SINTEF Building Research Design: SINTEF Building Research Design Guides www.byggforsk.no
‘Äldre murverkshus. Reperasjoner och ombyggnad’ ISBN 91-540-5119-3